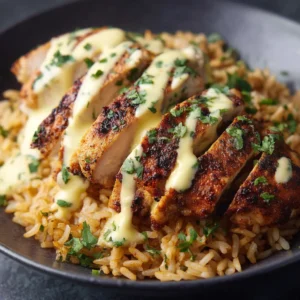
Forget takeout! These homemade Japanese Katsu Bowls bring the signature flavors of your favorite restaurant right to your kitchen. Featuring a shatteringly crispy panko-crusted chicken cutlet served over a bed of fluffy steamed rice and topped with a sweet and tangy tonkatsu sauce, this recipe is a game-changer for weeknight dinners. It’s surprisingly simple to prepare and delivers a satisfying crunch and flavor combination that the whole family will love.
We’ll walk you through every step, from pounding the chicken to the perfect thickness to mixing up a simple yet authentic-tasting tonkatsu sauce from scratch. Get ready to master this iconic Japanese comfort food.
What Are Japanese Katsu Bowls?
A “katsu bowl” is a type of Japanese rice bowl, or donburi. The star of the show is the “katsu,” which refers to a deep-fried cutlet of meat, most commonly chicken (tori katsu) or pork (tonkatsu), coated in crispy panko breadcrumbs. The cooked cutlet is sliced into strips and served over a bowl of steamed Japanese rice. It’s almost always accompanied by very thinly shredded cabbage and a generous drizzle of savory tonkatsu sauce.
Why You’ll Love This Recipe
- Incredibly Crispy: We use a classic three-step breading process with panko breadcrumbs to guarantee a light, airy, and super crunchy crust that stays crispy.
- Simple Homemade Sauce: Our easy, no-cook tonkatsu sauce uses just four pantry staples and tastes so much better than the bottled kind.
- Quick & Easy: This impressive meal comes together in about 30 minutes, making it perfect for a busy weeknight.
- Family-Friendly: The combination of crispy chicken, rice, and a sweet and savory sauce is a certified hit with both kids and adults. If you love this, you might also enjoy our tasty taco rice bowl recipe!
 1")
Ingredients You’ll Need
This recipe uses simple, easy-to-find ingredients. Let’s break them down into their three main components.
For the Chicken Katsu:
- Chicken Breasts: Two large, boneless, skinless chicken breasts, about 1 lb total.
- All-Purpose Flour: This is the first layer of our breading, helping the egg wash stick.
- Egg: A single large egg is all you need to bind the panko to the chicken.
- Panko Breadcrumbs: This is non-negotiable for authentic katsu! Japanese panko breadcrumbs are lighter and flakier than regular breadcrumbs, which creates a much crispier texture.
- Salt and Black Pepper: For seasoning the chicken and flour.
- Neutral Oil: For shallow frying. Canola, vegetable, or grapeseed oil works great.
For the Tonkatsu Sauce:
- Ketchup: The sweet and tangy base of our sauce.
- Worcestershire Sauce: Adds a deep, savory, umami flavor.
- Oyster Sauce: Provides a sweet and salty kick. Soy sauce can be used in a pinch.
- Sugar: Just a touch to balance the flavors.
For the Bowls:
- Steamed Rice: Short or medium-grain Japanese rice is best for its fluffy, slightly sticky texture.
- Green Cabbage: A small head of cabbage, shredded as finely as possible. This adds a crucial fresh, crunchy element.
- Optional Garnishes: Toasted sesame seeds, sliced green onions, or Japanese mayonnaise (like Kewpie).
How to Make Homemade Tonkatsu Sauce
Making your own tonkatsu sauce couldn’t be easier, and it allows you to control the flavor. Simply combine the ketchup, Worcestershire sauce, oyster sauce, and sugar in a small bowl. Whisk until the sugar has completely dissolved and the sauce is smooth. That’s it! Set it aside while you prepare the rest of your Japanese Katsu Bowls.
Step-by-Step: Making The Perfect Japanese Katsu Bowls
Follow these simple steps for a flawless meal every time.
1. Prepare the Chicken
Slice each chicken breast in half horizontally to create four thinner cutlets. Place the cutlets between two pieces of plastic wrap and use a meat mallet or rolling pin to gently pound them to an even thickness of about 1/2 inch. Season both sides of each cutlet generously with salt and pepper.
2. Set Up the Breading Station
You’ll need three shallow dishes. In the first, mix the flour with a pinch of salt and pepper. In the second, whisk the egg with a tablespoon of water. In the third, place the panko breadcrumbs. Dredge each chicken cutlet first in the flour, shaking off any excess. Next, dip it into the egg wash, ensuring it’s fully coated. Finally, press the cutlet firmly into the panko, covering it completely on both sides.
 2")
3. Frying to Golden Perfection
Pour about an inch of neutral oil into a large skillet or pan and heat over medium-high heat until it reaches 350°F (175°C). Carefully place two breaded cutlets in the hot oil. Fry for 3-4 minutes per side, until they are deep golden brown and cooked through. Remove the katsu from the pan and let it drain on a wire rack. Repeat with the remaining two cutlets.
4. Assembling Your Katsu Bowl
Let the chicken katsu rest for a couple of minutes before slicing it into 1-inch strips. To assemble your bowls, add a generous portion of steamed rice to the bottom. Top with a pile of finely shredded cabbage and then arrange the sliced chicken katsu over the top. Drizzle generously with your homemade tonkatsu sauce and finish with a sprinkle of sesame seeds or green onions, if desired.
Expert Tips for the Crispiest Katsu
- Don’t Skip the Pounding: Pounding the chicken to an even thickness ensures it cooks quickly and evenly without the panko burning.
- Press Panko Firmly: Make sure you press the panko breadcrumbs firmly onto the chicken to create a thick, crunchy crust that won’t fall off during frying.
- Maintain Oil Temperature: If the oil is too cool, the katsu will be greasy. If it’s too hot, the panko will burn before the chicken is cooked. Use a thermometer for best results.
- Use a Wire Rack: Resting the cooked katsu on a wire rack instead of paper towels prevents the bottom from getting soggy.
Variations & Serving Suggestions
While this recipe is fantastic as is, feel free to customize it! You can easily swap the chicken for thin, boneless pork chops to make Tonkatsu. For a different flavor profile, try serving it with a side of quick sautéed vegetables. If you enjoy Asian-inspired chicken recipes, our honey soy glazed chicken is another must-try dish. And if you’re a fan of noodle dishes, you’ll love this easy chow mein recipe.
Frequently Asked Questions
Absolutely! To make classic Tonkatsu, simply substitute the chicken breasts with 1/2-inch thick boneless pork chops. The preparation and cooking process remains exactly the same.
The key is a three-step breading process: first flour, then egg, then panko. Make sure to press the panko firmly onto the chicken. Frying in oil that’s hot enough (around 350°F or 175°C) ensures the crust becomes crispy and golden without absorbing too much oil.
A katsu bowl is a complete meal on its own, traditionally served with steamed short-grain rice and finely shredded cabbage. You can also serve it alongside a bowl of miso soup for a more complete Japanese meal.
Katsu sauce, or tonkatsu sauce, is a sweet and savory sauce with a tangy flavor. Our simple homemade version is made with a base of ketchup, Worcestershire sauce, oyster sauce, and a little sugar for balance.
Katsu is the general Japanese term for a deep-fried cutlet coated in panko. Tonkatsu is a specific type of katsu made with pork (ton). Tori Katsu, as used in this recipe, is made with chicken (tori).
More Delicious Dinner Recipes
Japanese Katsu Bowls (Crispy & Easy Recipe)
Ingredients
Equipment
Instructions
- In a small bowl, whisk together the ketchup, Worcestershire sauce, oyster sauce, and sugar until the sugar is dissolved and the sauce is smooth. Set aside.
- Slice each chicken breast in half horizontally to create four thin cutlets. Place between plastic wrap and pound to an even 1/2-inch thickness. Season both sides with salt and pepper.
- Arrange three shallow dishes. In the first, place the flour. In the second, the beaten egg. In the third, the panko breadcrumbs. Coat each cutlet in flour, then egg, then press firmly into the panko to coat completely.
- Heat about 1 inch of oil in a large skillet over medium-high heat to 350°F (175°C). Fry the cutlets in batches for 3-4 minutes per side, until golden brown and cooked through. Drain on a wire rack.
- Slice the cooked katsu into 1-inch strips. Fill each bowl with steamed rice, top with shredded cabbage, and arrange the sliced katsu on top. Drizzle generously with tonkatsu sauce and garnish with sesame seeds and green onions.
Notes
Tip 2: Shred your cabbage as finely as possible for the best texture. A mandoline slicer works wonders for this.
Tip 3: Let the katsu rest for a minute or two on a wire rack before slicing to keep the crust intact.
Share Your Creation!
We are so excited for you to try these incredible Japanese Katsu Bowls! They are a true testament to how simple ingredients can create something truly special. If you make this recipe, we would love to see it! Please leave a comment below or share a photo on Pinterest and tag us. Your feedback helps us and inspires other home cooks!
 4")