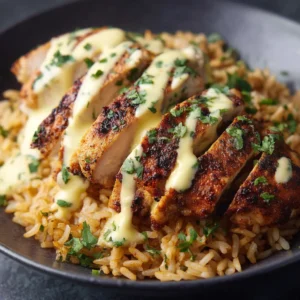
Craving a meal that’s incredibly satisfying, packed with flavor, and delivers a delightful crunch? Look no further than this Japanese Katsu Bowl recipe. This dish, a beloved staple in Japanese cuisine, brings together a perfectly crispy chicken cutlet, fluffy rice, and a savory-sweet sauce into one unforgettable bowl of comfort.
Making a restaurant-quality katsu bowl at home is easier than you think. We’ll walk you through every step to ensure your chicken is juicy on the inside and perfectly golden and crunchy on the outside. Get ready to master this iconic dish!
What is a Japanese Katsu Bowl?
A Japanese Katsu Bowl, or Katsudon, is a type of ‘donburi,’ which translates to “rice bowl dish.” It consists of a bowl of steamed rice topped with a deep-fried breaded cutlet (‘katsu’), typically pork (tonkatsu) or chicken (torikatsu). The katsu is simmered with sliced onions in a savory broth made from dashi, soy sauce, and mirin, then bound together with a lightly cooked egg before being served over the rice.
This recipe focuses on chicken katsu for a lighter but equally delicious version of the classic. It’s the ultimate comfort food, combining a wonderful mix of textures and flavors in every single bite.
Why You’ll Love This Easy Katsu Bowl Recipe
If you’re looking for a new go-to weeknight dinner, this is it. Here’s why this recipe will become a fast favorite in your home.
- Incredibly Flavorful: The combination of the crispy panko-crusted chicken and the rich, umami-packed sauce is simply irresistible.
- Amazing Textures: You get the satisfying crunch from the katsu, the fluffiness of the rice, and the soft, savory onions and egg topping.
- Faster Than Takeout: This impressive meal comes together in about 35 minutes, making it perfect for a busy evening when you want something special without the wait.
- Simple Ingredients: You’ll find most of these ingredients are pantry staples or easily found at your local grocery store.
The Key Ingredients for a Perfect Katsu Bowl
The magic of this dish comes from a few key components working in perfect harmony. Here’s what you’ll need.
For the Crispy Chicken Katsu:
- Chicken Breasts: Use boneless, skinless chicken breasts, pounded to an even thickness for quick and uniform cooking.
- All-Purpose Flour: This creates the base layer for the breading to adhere to.
- Egg: Acts as the binder that holds the panko onto the chicken.
- Panko Breadcrumbs: This is non-negotiable for authentic katsu! Japanese panko breadcrumbs are lighter and flakier than regular breadcrumbs, which results in an incredibly crispy, airy crust.
- Salt and Pepper: For seasoning the chicken.
- Neutral Oil: For frying. Canola, vegetable, or avocado oil are all great choices.
For the Bowl and Sauce:
- Short-Grain Rice: Japanese short-grain rice is best for its fluffy, slightly sticky texture.
- Yellow Onion: Thinly sliced, it adds a lovely sweetness and texture to the sauce.
- Dashi Stock: The foundational flavor of the simmering sauce. You can use instant dashi granules or make your own.
- Soy Sauce: For that essential salty, umami flavor.
- Mirin: A sweet Japanese rice wine that adds sweetness and a beautiful glaze.
- Sugar: Just a touch to balance the saltiness of the soy sauce.
- Eggs: Lightly beaten to create the soft, savory topping that brings the bowl together.
- Garnishes: Sliced scallions or nori strips for a fresh, finishing touch.

How to Make a Japanese Katsu Bowl (Step-by-Step)
Follow these simple steps to create the perfect katsu bowl. We’ll break it down into preparing the chicken, frying it, making the sauce, and assembling the final dish.
Step 1: Prepare the Chicken
Place the chicken breasts between two sheets of parchment paper or plastic wrap. Using a meat mallet or a heavy rolling pin, pound the chicken to an even thickness of about 1/2 inch. Season both sides generously with salt and pepper.
Step 2: Bread the Chicken Cutlets
Set up a breading station with three shallow dishes. Place the flour in the first dish, a lightly beaten egg in the second, and the panko breadcrumbs in the third. Dredge each piece of chicken first in the flour, shaking off any excess. Next, dip it into the egg, ensuring it’s fully coated. Finally, press the chicken firmly into the panko breadcrumbs, covering it completely. This three-step process is the key to a crust that stays put.
Step 3: Fry to Golden Perfection
In a large skillet, heat about an inch of neutral oil over medium-high heat until it reaches 350°F (175°C). Carefully place the breaded chicken cutlets in the hot oil, making sure not to overcrowd the pan. Fry for 3-4 minutes per side, or until the katsu is deep golden brown and cooked through. Remove the chicken from the skillet and let it rest on a wire rack to drain excess oil and maintain its crispiness.
Step 4: Prepare the Sauce and Toppings
While the chicken rests, prepare the sauce. In a small pan, combine the dashi stock, soy sauce, mirin, and sugar. Bring the mixture to a simmer over medium heat. Add the thinly sliced onions and cook for 3-4 minutes until they have softened. Once cooked, slice the chicken katsu into 1-inch thick strips and place them in the pan on top of the onions. Pour the lightly beaten eggs over and around the chicken. Cover the pan and cook for 1-2 minutes, just until the eggs are softly set.
Step 5: Assemble Your Japanese Katsu Bowl
To serve, fill two bowls with hot steamed rice. Carefully slide the katsu, onion, and egg mixture from the pan directly on top of the rice. Garnish with freshly sliced scallions or nori strips and serve immediately while the katsu is still crispy.

Tips for the Crispiest, Juiciest Chicken Katsu
Want to elevate your katsu game? These pro tips will guarantee a perfect result every single time.
- Pound it Out: Pounding the chicken to an even thickness is crucial. It ensures the chicken cooks quickly and evenly, preventing it from drying out before the crust is perfectly golden.
- Don’t Skip the Panko: For that authentic, ultra-crispy texture, Japanese panko is essential. Its large, airy flakes absorb less oil, resulting in a lighter, crunchier coating.
- Mind the Oil Temperature: Use a thermometer to ensure your oil is at 350°F (175°C). If the oil is too cool, the katsu will absorb too much oil and become greasy. If it’s too hot, the panko will burn before the chicken is cooked through.
- Give it Space: Don’t overcrowd your frying pan. Frying in batches ensures the oil temperature doesn’t drop, which helps in achieving that perfectly crispy exterior.
Variations and Substitutions
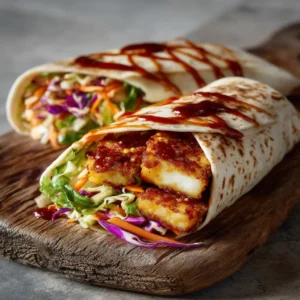
While this chicken katsu bowl is a classic, you can easily adapt it to your liking. If you love crispy chicken recipes, you might also enjoy this teriyaki chicken wrap.
- Pork Katsu (Tonkatsu): For a more traditional version, simply substitute the chicken with boneless pork chops, pounded to the same thickness.
- Tofu Katsu: For a vegetarian option, use firm or extra-firm tofu. Press the tofu well to remove excess water before breading and frying.
- Homemade Tonkatsu Sauce: While not used in the simmering sauce, many enjoy drizzling Tonkatsu sauce over the finished katsu before the egg mixture is added. You can buy it pre-made or make your own with ketchup, Worcestershire sauce, soy sauce, and a little sugar.
What to Serve with Your Katsu Bowl
A Japanese Katsu Bowl is a complete meal on its own, but it pairs wonderfully with a few simple sides. A bowl of classic miso soup is a perfect starter. For a refreshing contrast, serve it alongside some pickled ginger (gari) or a simple Japanese cucumber salad (sunomono). For another hearty dish, try this beef and bok choy stir-fry. Or, for a fusion twist, our honey pepper chicken mac and cheese is always a crowd-pleaser.
FAQs about Japanese Katsu Bowl
It is best served fresh to enjoy the crispy texture of the katsu. However, you can fry the chicken katsu ahead of time and store it in the refrigerator. Reheat it in an oven or air fryer to restore crispiness before preparing the sauce and assembling the bowl.
To keep katsu crispy, fry it in oil that’s hot enough (around 350°F/175°C), rest it on a wire rack instead of a paper towel, and serve it immediately after adding the egg and sauce mixture. Don’t let it simmer for too long.
A Japanese Katsu Bowl, or Katsudon, is made of a breaded and fried pork or chicken cutlet (katsu) that has been simmered with onion and a beaten egg in a savory sauce. This mixture is then served over a bowl of steamed rice.
The simmering sauce for a katsu bowl is typically made from a base of dashi (Japanese stock), soy sauce, mirin (sweet rice wine), and a little sugar. This creates a balanced sweet and savory flavor that is key to the dish.
‘Katsu’ refers to the deep-fried, panko-breaded cutlet itself. ‘Katsudon’ refers to the complete rice bowl dish (‘donburi’) where the katsu is served over rice, typically with an egg and onion sauce.
The Perfect Japanese Katsu Bowl Recipe
Japanese Katsu Bowl: The Ultimate Crispy Recipe
Ingredients
Equipment
Instructions
- Pound the chicken breasts to an even 1/2-inch thickness. Season both sides with salt and pepper.
- Set up a breading station with three shallow dishes for flour, beaten egg, and panko. Coat the chicken in flour, then egg, and finally press firmly into the panko to coat completely.
- Heat oil in a large skillet over medium-high heat to 350°F (175°C). Fry the chicken for 3-4 minutes per side, until golden brown and cooked through. Transfer to a wire rack to drain.
- In a separate pan, combine dashi, soy sauce, mirin, and sugar. Bring to a simmer. Add the sliced onions and cook until soft, about 3-4 minutes.
- Slice the fried katsu into strips and add it to the simmering sauce. Pour the lightly beaten eggs over the chicken. Cover and cook for 1-2 minutes until the eggs are just set.
- Divide the hot cooked rice between two bowls. Gently slide the chicken katsu and egg mixture on top of the rice. Garnish with sliced scallions and serve immediately.
Notes
Ensure your oil is at the correct temperature before frying to prevent greasy chicken.
Pounding the chicken to an even thickness is key for even cooking.
Share Your Creation!
We hope you love making and eating this delicious Japanese Katsu Bowl. It’s a dish that’s sure to impress family and friends. If you make it, we’d love to see! Share your photos and tag us on Pinterest.