There is nothing quite as satisfying as recreating restaurant-quality takeout in your own kitchen, and this authentic Dragon Chicken Recipe delivers on every single front. If you have been craving crispy fried chicken strips thickly coated in a glossy, sticky, deep vibrant red-orange sauce, you are in exactly the right place.
This dish is a masterclass in contrasting textures and bold, unapologetic Asian-inspired flavors. Each tender strip of chicken boasts a shatteringly crisp crust that acts as the perfect canvas for a perfectly balanced sweet and spicy sauce.
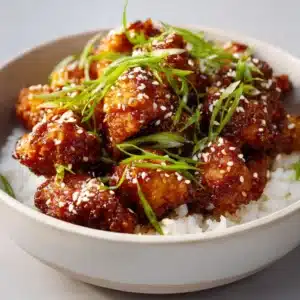
Served beautifully in a shallow white ceramic bowl, the presentation alone is enough to make your mouth water. Heavily garnished with roasted cashew nuts, diagonally sliced fresh green spring onions, and scattered white sesame seeds, this Dragon Chicken Recipe is a sensory triumph.

Why This Vibrant Sweet and Spicy Chicken Will Become Your Favorite Dinner
Creating the ultimate Dragon Chicken Recipe is all about layering flavor and executing essential culinary techniques. This recipe is meticulously engineered to look as incredible as it tastes.
- Unbeatable Crunch: A specialized double-coating technique using cornstarch and flour ensures the chicken strips stay incredibly crispy, even after being tossed in the thick, wet sauce.
- Sensory Garnishes: The generous topping of crunchy roasted cashew nuts and toasted white sesame seeds provides an earthy contrast to the sugary, spicy glaze.
- Vibrant Aesthetic: The signature deep red-orange hue of the glossy sauce makes this dish visually stunning, mimicking high-end restaurant food photography.
- Aromatic Heat: Small pieces of dried red chili peppers infuse the thick sauce with a steady, lingering warmth that perfectly cuts through the honeyed sweetness.
Essential Ingredients for the Perfect Glossy Red-Orange Sauce
Every element in this Dragon Chicken Recipe plays a precise role. We use a combination of pantry staples to build a highly structured, stable sauce and a bulletproof crispy batter.

The Chicken and Crispy Batter Components
1 lb (450g) Boneless, Skinless Chicken Breasts: Sliced into thin, uniform strips to ensure quick, even frying and a high crust-to-meat ratio. You can also use chicken thighs if you prefer darker meat.
1/4 cup (30g) Cornstarch & 2 tbsp (15g) All-Purpose Flour: This specific ratio is the culinary secret to a crust that puffs slightly and hardens to a golden crunch. The cornstarch provides the crispness, while the flour adds necessary structure.
1 large Egg (50g): Acts as the vital binding agent, locking the dry ingredients onto the slippery chicken surface during the high-heat frying process.
1 tbsp (15ml) Light Soy Sauce & 1/2 tsp (2.5g) Black Pepper: Injected directly into the raw meat as a primary marinade to season the chicken from the inside out.
The Aromatic and Sauce Foundations
3 tbsp (45ml) Ketchup & 2 tbsp (30ml) Chili Garlic Sauce: These form the base of that iconic deep vibrant red-orange hue. The ketchup brings foundational sweetness and tang, while the chili garlic sauce adds textured heat.
2 tbsp (30ml) Light Soy Sauce & 1 tbsp (15ml) Dark Soy Sauce: Light soy adds salt and umami, whereas the dark soy sauce deepens the color of the glaze, contributing to that striking visual appeal.
2 tbsp (30ml) Honey & 1 tbsp (15ml) Rice Vinegar: The honey creates the necessary stickiness and gloss, melting into the heat. The rice vinegar slices through the sugar, offering essential acidity.
4 Dried Red Chili Peppers: Snapped into small pieces, these are bloomed in hot oil. They release their volatile oils into the pan, embedding deep spice directly into the sauce’s DNA.
1 tbsp (15g) Minced Garlic & 1 tbsp (15g) Minced Ginger: The irreplaceable aromatic base. Minced fresh, they release an intoxicating fragrance that forms the backbone of any authentic stir-fry.
1 tbsp (8g) Cornstarch & 2 tbsp (30ml) Cold Water (The Slurry): This invisible but mandatory mixture thickens the simmering liquids within seconds. It transforms watery juices into a thick, glossy, sticky lacquer.
2 cups (480ml) Neutral Frying Oil: Canola, vegetable, or peanut oil are required for frying. They possess high smoke points, ensuring the chicken fries cleanly without burning the oil.
The Heavy Garnishes
1/2 cup (70g) Roasted Cashew Nuts: Adding these at the very end maintains their buttery snap, complementing the spicy profile beautifully.
3 stalks Fresh Green Spring Onions: Sliced diagonally for an elegant, professional look. They add a sharp, fresh bite that awakens the rich, fried elements.
1 tbsp (9g) White Sesame Seeds: Scattered over the top, these tiny seeds provide visual contrast against the dark, glossy red-orange sauce and a subtle nutty aroma.
Culinary Tools Required for Deep Frying and Sautéing
Having the right equipment is just as important as the ingredients. Proper tools ensure your safety and guarantee the textures described in this Dragon Chicken Recipe.
- Heavy-Bottomed Dutch Oven or Deep Wok: Essential for maintaining a consistent oil temperature when deep frying the chicken strips.
- Instant-Read Frying Thermometer: The only way to guarantee your oil is precisely at 350°F (175°C) for the perfect golden crust.
- Spider Skimmer or Slotted Spoon: Necessary for safely and swiftly removing the crispy fried chicken from the boiling oil.
- Large Stainless Steel or Non-Stick Skillet: Provides a wide surface area for reducing the thick sauce and quickly tossing the chicken.
How to Make Authentic Dragon Chicken Step-by-Step
Executing this Dragon Chicken Recipe requires a bit of prep, but the cooking process moves quickly. Read through these steps entirely before you begin.
1. Slicing and Marinating the Chicken Strips
Begin by patting your chicken breasts dry with a paper towel. Slice them crosswise into uniform 1/2-inch strips. This uniformity guarantees that every piece finishes cooking at the exact same time.
Place the strips into a large mixing bowl. Add the light soy sauce, black pepper, and the whole egg. Massage the wet ingredients vigorously into the meat until fully absorbed.
Next, sprinkle the cornstarch and all-purpose flour over the wet chicken. Toss with your hands until a thick, shaggy batter forms around each individual strip. Let this rest for 10 minutes to hydrate the starches.
2. Frying for a Golden, Shatter-Proof Crust
Pour your neutral frying oil into a heavy-bottomed pot, filling it no more than halfway. Attach your thermometer and heat the oil over medium-high heat until it registers exactly 350°F (175°C).
Carefully drop the battered chicken strips into the hot oil one by one to prevent them from sticking together. Fry in batches to avoid crowding the pot, which lowers the oil temperature and causes soggy batter.
Fry for 4 to 5 minutes. You are looking for a deep golden-brown exterior and a violent, energetic bubbling action in the oil. Remove the chicken with a spider skimmer and transfer to a wire rack. A wire rack allows excess steam to escape, preserving the ultra-crispy crust.
3. Blooming the Aromatics and Dried Red Chilies
In your large skillet, heat 2 tablespoons (30ml) of clean cooking oil over medium heat. Snap your dried red chili peppers into small, visible pieces and toss them into the warm oil.
Stir them constantly for 30 seconds until the oil turns slightly red and the kitchen smells wonderfully spicy. Immediately add the minced garlic and minced ginger.
Sauté the aromatics for another 45 seconds until they turn golden and fragrant. Do not let the garlic brown, as it will introduce a bitter flavor to the delicate glaze.
4. Thickening the Sticky Sweet and Spicy Sauce
Into the sizzling aromatics, pour the ketchup, chili garlic sauce, light soy sauce, dark soy sauce, honey, rice vinegar, and chicken broth. Whisk the mixture together.
Bring the skillet to a rolling simmer. In a small bowl, thoroughly mix your cornstarch and cold water until smooth. Pour this slurry directly into the bubbling sauce.
Stir continuously for about 60 to 90 seconds. You will visually witness a magical transformation. The sauce will rapidly thicken, transforming from a cloudy liquid into a glossy, sticky, deep vibrant red-orange lacquer.
5. The Final Toss and Heavy Garnishing
Turn off the heat beneath your skillet entirely. Immediately dump all of the resting crispy fried chicken strips into the hot, thick sauce.
Use a spatula to fold the chicken repeatedly until every single crevice of the crispy batter is heavily coated in the sticky glaze. The sauce should cling tightly to the meat without pooling excessively at the bottom of the pan.
Transfer the sauced chicken to a shallow white ceramic bowl. To replicate stunning culinary photography, heavily garnish the dish immediately. Scatter the roasted cashew nuts evenly over the top.
Follow up with a generous handful of diagonally sliced fresh green spring onions. Finally, sprinkle the white sesame seeds over the dish, allowing them to catch the light against the glossy red-orange sauce.
Expert Culinary Tips for a Flawless Dragon Chicken Recipe
Even a straightforward dish like this Dragon Chicken Recipe benefits from professional culinary secrets. Keep these tips in mind for absolute perfection.
- The Double Fry Trick: For a crust that survives literal hours in the fridge, fry the chicken once for 3 minutes, let it rest, then flash-fry it again at 375°F (190°C) for 2 minutes just before saucing.
- Never Skip the Slurry: If you try to reduce the sauce without the cornstarch slurry, the sugars will burn before the liquid naturally thickens. The slurry is what provides the signature gloss.
- Prep Your Garnishes Early: Asian stir-frying moves at lightning speed. Have your cashews, spring onions, and sesame seeds chopped and measured in small bowls before you even turn on the stove.
- Serve Immediately: While the batter is designed to be resilient, the contrast of the hot crispy chicken and the sticky sauce is at its absolute peak within the first 5 minutes of tossing.
Proper Storage and Reheating Techniques
If you find yourself with leftovers of this incredible Dragon Chicken Recipe, storing it correctly will help maintain some of its magic for the next day.
Allow the chicken to cool to room temperature, then place it in an airtight container. It will keep safely in the refrigerator for up to 3 days. Freezing is not recommended, as the crispy batter will become completely waterlogged upon thawing.
To reheat, bypass the microwave entirely. Place the leftover chicken on a parchment-lined baking sheet and bake at 350°F (175°C) for 10-12 minutes. The oven’s dry heat helps re-crisp the exterior while gently warming the sticky sauce without burning the sugars.
What to Serve Alongside Your Sticky Asian Chicken
While this Dragon Chicken Recipe is undeniably the star of the show, pairing it with the right side dishes elevates the entire meal experience.
A bed of steaming hot jasmine rice or fluffy egg fried rice is the traditional choice, perfect for soaking up any extra glossy red-orange sauce. If you prefer noodles, serving this alongside some spicy Thai drunken noodles makes for an epic takeout-style feast.
To cut through the richness of the fried batter and sweet glaze, you need freshness. A crisp, vibrant Asian cabbage salad offers a fantastic textural contrast. Alternatively, a cooling cucumber mozzarella salad or some savory Asian beef short ribs on the side can round out a massive weekend dinner spread.
Frequently Asked Questions About Dragon Chicken
Yes, they are fundamental to building authentic flavor. Blooming the snapped dried red chili peppers in hot oil releases their aromatic, smoky heat into the sauce base without making the entire dish overwhelmingly fiery.
Absolutely. While this recipe calls for boneless, skinless chicken breasts sliced into strips for quick frying, chicken thighs are an excellent alternative. They naturally contain more fat and will yield an even juicier interior beneath the crispy batter.
The secret lies in the batter ratio. Using a combination of cornstarch and all-purpose flour, along with an egg binder, creates a sturdy crust. Additionally, ensure your frying oil is at a steady 350°F (175°C) and serve the dish immediately after tossing.
Dragon Chicken is a perfectly balanced Indo-Chinese dish that is simultaneously sweet, savory, and spicy. The thick, glossy red-orange sauce heavily coats shatteringly crispy fried chicken strips, while roasted cashews provide an earthy crunch.
If your sauce remains watery, it means the cornstarch slurry was either omitted or not activated by enough heat. Make sure you mix the cornstarch with cold water first, then pour it into a rolling simmer for at least 60 seconds to trigger the thickening process.
Official Dragon Chicken Recipe Card
Below you will find the complete, printable steps and exact measurements for our famous Dragon Chicken Recipe. Be sure to check the notes section for quick reminders on achieving that perfect crispy crust and glossy finish.
The Ultimate Dragon Chicken Recipe (Sticky, Spicy & Crispy)
Ingredients
Equipment
Instructions
- Slice the chicken breasts into 1/2-inch strips. In a bowl, massage the chicken with the light soy sauce, black pepper, and whole egg until fully absorbed.
- Sprinkle the cornstarch and flour over the chicken. Toss with your hands until a thick batter coats each strip. Let rest for 10 minutes.
- Heat the frying oil in a Dutch oven to 350°F (175°C).
- Drop chicken strips into the oil one by one. Fry in batches for 4 to 5 minutes until deep golden-brown. Remove and drain on a wire rack.
- In a large skillet, heat 2 tbsp of oil over medium heat. Sauté the broken dried red chili peppers for 30 seconds, then add minced garlic and ginger. Sauté for 45 more seconds.
- Whisk in the ketchup, chili garlic sauce, light soy sauce, dark soy sauce, honey, rice vinegar, and chicken broth. Bring to a simmer.
- Mix the remaining 1 tbsp of cornstarch with 2 tbsp of cold water. Pour the slurry into the simmering sauce, stirring constantly for 60 to 90 seconds until thick, glossy, and vibrant red-orange.
- Turn off the heat. Add the crispy fried chicken strips into the skillet. Fold until heavily coated in the sticky sauce.
- Transfer the chicken to a shallow white ceramic bowl. Heavily garnish with roasted cashew nuts, diagonally sliced green spring onions, and scattered white sesame seeds. Serve immediately.
Notes
Tip 2: Do not skip the dark soy sauce; it is crucial for achieving the beautiful, deep visual color of the sauce.

Share Your Dragon Chicken Creation With Us!
We hope this Dragon Chicken Recipe brings incredible flavor and restaurant-quality flair to your dining table. If you successfully recreate this glossy, sticky masterpiece, we would absolutely love to hear about it.
Leave a star rating and a comment below detailing how your frying process went. Don’t forget to pin this recipe to your favorite dinner boards on Pinterest so you never lose track of it!