Welcome to the only chocolate mousse filling recipe you will ever need. If you’ve ever dreamed of slicing into a cake with perfectly defined, luscious layers of rich, airy mousse, you’ve come to the right place. This recipe is engineered to be foolproof, creating a filling that is both decadently flavorful and incredibly stable. Forget runny fillings that ruin your beautiful cakes; this is a game-changer.
We are creating a mousse that is specifically designed to hold its own. It’s light and airy on the tongue but firm enough to support cake layers, making it the perfect companion for your baking projects.
Why This Chocolate Mousse Filling is the Best for Cakes
Not all mousse recipes are created equal. A mousse meant to be eaten from a bowl is often too delicate to be used as a filling. This chocolate mousse filling recipe, however, is built for structure. We use a simple secret ingredient to ensure it sets up perfectly every single time, giving you clean slices and zero stress. The result is a rich, deep chocolate flavor with a texture that is pure heaven.
Key Ingredients for a Foolproof Mousse
The beauty of this recipe lies in its simplicity. We use just a handful of high-quality ingredients to achieve a truly premium result.
- High-Quality Dark Chocolate: This is the star of the show. Choose a good quality dark or semi-sweet chocolate (60-72% cacao) for the best flavor. Avoid chocolate chips, which contain stabilizers that prevent smooth melting.
- Heavy Whipping Cream: You’ll need cold heavy whipping cream to create the light, airy texture. Full-fat is essential here.
- Unflavored Gelatin: Our secret weapon for stability! A small amount of gelatin ensures your filling sets up firmly enough to handle cake layers without being rubbery.
- Powdered Sugar: To add a touch of sweetness without any graininess.
- Vanilla Extract & Salt: These are flavor enhancers that round out the deep chocolate notes.

How to Make the Perfect Chocolate Mousse Filling (Step-by-Step)
Making this filling is easier than you might think. Just follow these simple steps for a perfect, stable mousse every time. This process ensures a light texture that sets up beautifully.
Step 1: Bloom the Gelatin
Start by sprinkling the unflavored gelatin over cold water in a small bowl. Let it sit for 5-10 minutes until it has absorbed the water and “bloomed.” This step is crucial for activating the gelatin.
Step 2: Melt the Chocolate
While the gelatin blooms, gently melt your chopped chocolate. You can do this in a double boiler or in the microwave in 20-second intervals, stirring in between. Once smooth, set it aside to cool slightly. You want it to be melted but not hot.
Step 3: Whip the Cream
Using an electric mixer, whip the cold heavy cream, powdered sugar, and vanilla extract until medium-stiff peaks form. This means the peaks will hold their shape but still have a slight curl at the tip. Be careful not to over-whip, or the mousse will be grainy.

Step 4: Combine and Fold
Gently microwave the bloomed gelatin for 5-10 seconds until it’s liquid. Whisk a spoonful of the melted chocolate into the gelatin mixture to temper it, then whisk this back into the main bowl of melted chocolate. Now, gently fold the whipped cream into the chocolate mixture in three additions. Be gentle to maintain all that air you whipped into it!
Pro Tips for Mousse-Making Success
To ensure your chocolate mousse filling is absolutely perfect, keep these tips in mind.
- Use Room Temperature Ingredients (Except Cream): Besides the heavy cream, which must be cold, other ingredients incorporate better at room temperature.
- Don’t Overheat the Chocolate: Burnt chocolate is bitter and grainy. Melt it low and slow for the best results.
- Fold, Don’t Stir: The key to a light mousse is the folding technique. Use a spatula to gently scrape around the bowl and fold the mixture over on itself to combine the ingredients without deflating the cream.
Fun Ways to Use Your Chocolate Mousse Filling
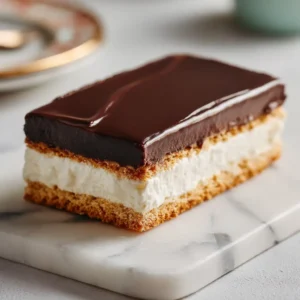
This mousse is incredibly versatile! Of course, it’s perfect for layer cakes, but you can also use it to fill cupcakes, create a simple tart, or even layer it in glasses for an elegant dessert parfait. It’s a fantastic base for more complex desserts, like our Chocolate Eclair Cake. It also pairs wonderfully with fruit, making it a great filling for a Chocolate Raspberry Tart.
Variations and Customizations
Want to mix things up? This recipe is a great canvas for other flavors.
Spiked Chocolate Mousse
Add a tablespoon of your favorite liqueur, like Grand Marnier or Irish cream, to the melted chocolate for a grown-up twist.
Mint Chocolate Variation
Add 1/2 teaspoon of peppermint extract to the heavy cream before whipping for a classic flavor combination. This would be delicious with our Bakery-Style Chocolate Chip Cookies crumbled on top.
Espresso-Infused Mousse
Dissolve one teaspoon of instant espresso powder in the cold water before adding the gelatin. The coffee enhances the chocolate flavor beautifully.
Storing Your Mousse Filling
You can make the mousse a day or two before you need it. Store it in an airtight container in the refrigerator for up to 3 days. It will become quite firm once chilled. When you’re ready to use it, give it a gentle but brief stir to make it more spreadable.
Frequently Asked Questions About Chocolate Mousse Filling
For a filling that needs to be truly stable, gelatin is highly recommended. For a softer filling for trifles or dessert cups, you could omit it, but it will not be firm enough to support a layer cake.
While you can, traditional chocolate mousse is often too soft and may not hold the weight of cake layers, causing them to slide. A dedicated chocolate mousse filling recipe, like this one with gelatin, is specifically designed for stability.
The key to a thick, stable chocolate mousse for filling is a stabilizing agent like gelatin. Blooming a small amount of gelatin in water and adding it to the chocolate base ensures the mousse sets firmly and holds its shape between cake layers.
This chocolate mousse filling can be made up to 2 days in advance. Store it in an airtight container in the refrigerator. Before using, you may want to gently stir it to loosen it up slightly if it has become very firm.
For the richest flavor, use a high-quality dark or semi-sweet chocolate with a cacao content between 60% and 72%. Avoid using chocolate chips, as they often contain stabilizers that prevent them from melting smoothly.
The Ultimate Chocolate Mousse Filling Recipe
Chocolate Mousse Filling: The Ultimate Rich & Stable Recipe
Ingredients
Equipment
Instructions
- In a small bowl, sprinkle the gelatin over the cold water. Let it sit for 5-10 minutes until the gelatin has absorbed all the water.
- In a separate medium bowl, melt the chopped chocolate either in the microwave in 20-second bursts or over a double boiler. Stir until smooth, then set aside to cool to just above room temperature.
- In the bowl of a stand mixer or with a hand mixer, whip the cold heavy cream, powdered sugar, salt, and vanilla extract on medium-high speed until medium-stiff peaks form.
- Microwave the bloomed gelatin for 5-10 seconds, just until it turns to liquid. Immediately whisk it into the slightly cooled melted chocolate until fully combined.
- Gently fold about one-third of the whipped cream into the chocolate mixture to lighten it. Then, add the remaining whipped cream and fold until just combined and no streaks remain. Be careful not to overmix.
- Cover the mousse and refrigerate for at least 4-6 hours, or overnight, until firm. The mousse is now ready to be used as a filling.
Notes
Ensure the heavy cream is very cold to achieve the best volume when whipping.
The mousse must be thoroughly chilled to be stable enough for filling a cake.
Share Your Decadent Creations!
We are so excited for you to try this rich and stable chocolate mousse filling recipe. It will elevate your cakes and desserts to a whole new level! If you make it, we would love to see your creations. Please leave a comment below or tag us on Pinterest!